Frozen Eye

The Frozen Eye (氷の瞳, koori no hitomi?, lit. "Eye of Ice"), formally called the Ardelberg Buffer Band (アーデルベルグ緩衝帯, aaderbergu kanshou obi?) or Ardelburg Equilibrium Point, is one of the facilities of the First Tower of Ar tonelico, and it has the extremely important role of regulating the flow of Symphonic Power between the Parameno Discs and Grathnode Discs, and preventing said energy from backflowing, which could cause extreme damage to the Tower and its surroundings. This structure is made from a gigantic octahedral Ardel Crystal of the highest level of purity, and due to the intrinsec nature of said material, the energy can only flow in an ascending direction, and never in the inverse.
Likewise, this marks the divisory line between the Upper and Lower Worlds, and even if someone managed to sneak through the Teru's surveillance and go beyond the Pheyna Gate, the Frozen Eye serves as a dead end because there's no way of progressing further up due to the upper sections not being physically connected to the rest of the Tower. There are two warp gates that lead to the Symphonic Reactor, but both have some complicated requirements for their activation: one requires assitance from a Teru and using an item called the Circula Teleporter, while the other requires the permission from the Tower Administrator, since both were sealed following the Covenant of Elemia.
History
Due to its importance, the Frozen Eye's history is pretty much synonimous with the rest of the First Tower, and was one of the facilities that saw most usage during the First Era. In fact, all of its surfaces and crystals were always covered in sparks due to the great level of energy that flowed through it due to the widespread usage of Song Magic during the final years of said time period.
However, during the Grathnode Inferia, this protection system failed. Due to the buildup of Symphonic Power that couldn't be released through the Grathnode Discs because of the destruction of several important power lines, the Frozen Eye released enormous quantities of electricity and created a vacuum in the atmosphere, which had the final result of sending to the Discs more energy than what they were designed to handle, and shattered them. This in turn ended releasing the plasma that created the Blastline, and the shockwaves that devastated the land.
After this, the Frozen Eye has continued serving as the regulator for the energy that Reyvateils use for their Song Magic, since the Grathnode Discs still continue working in their shattered form, although only a 30% of them remain functional. Its other purpose was serving as the contact point between the Upper and Lower Worlds, although said contact became pretty much nonexistant after the Third Era began due to the creation of the Covenant of Elemia as a preventive measure against the Tower's power and technology being misused to the point in which it would end up destroying the world.
During the game, Lyner Barsett and his friends undergo a ritual called the Circula Baptism held by the Teru priestess, Tastiella De Lu, in order to return to the city of Platina. Lyner first told his friends that it would be better if he returned alone, since the ritual required their "death" in order to continue advancing. However, Tastiella told him that was only a way of talking, since the procedure required using Flip-Flop Conversion to send them to Platina through the power lines of the Tower, and after some nagging from his friends, Lyner accepted their help. Tastiella then used an Hymmnos Spell and the Circula Teleporter to open up the warp gate and allowed them to pass, while reminding Jack Hamilton that he also had an important task related to other of the party members, Misha Arsellec Lune, and telling him to hurry.
Later on, the Tower Administrator, Shurelia, declared that it would be for the best to allow contact with the Lower World again, and for this purpose, she opened the second warp gate that was located in this place. However, this also brought some undesirable consquences, such as the invasion of Platina by Bishop Falss.
Layout
The Frozen Eye isn't very large when it comes to its size or the dimensions of its rooms, which allows it to be traversed quickly. This is quite a luck, since this place serves as the only way of going back to Platina during most of Phase 2.
Maps
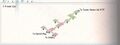
Frozen Eye Area Map

Frozen Eye Map 1
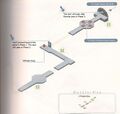
Frozen Eye Map 2 and Monster Map


Treasures
Monsters
- Trio de Pom (appears in Green areas)
- Big Pom (appears in Green areas)
- Tiny Pom (appears in Green areas)
- Yodelflower (appears in all areas)
- Feral Wolf (appears in Red areas)
- Wind Guarder (appears in Red areas)
- Wyrm (appears in Red areas)
- Melchior (appears in Green areas)
Number of Random Battles in this Area: 7
Trivia
- If the party visits the room where the Circula Baptism took place after Shurelia has joined, an scene with Shurelia explaining the nature of the Frozen Eye will take place.